Capture modes
The extension gives you several ways to save a testimonial: drag a box, save the visible window, send one image, or upload files you already have. Pick the one that fits what is in front of you.
Which one to use
What you have | What to use |
|---|---|
One testimonial on a page | Click the icon and drag a box |
Several testimonials on screen | Capture Full Page, and let AI split them |
An image on a page, such as a review graphic | Right-click it and choose Send to Magic Testimonials |
Screenshot files on your computer | The Upload tab, or Upload or Paste from Clipboard |
A screenshot you just copied | Upload or Paste from Clipboard |
Drag a box
This is the usual way, and it gives you a clean image of just the testimonial.
Click the Magic Testimonials icon. The page dims.
Click and drag a box around the testimonial.
In Preview Capture, check the image and the Project.
Click Capture. Redraw lets you drag again, and Cancel drops it.
Press Esc to stop. A box smaller than 50 pixels wide or tall closes with nothing saved.
Open the panel
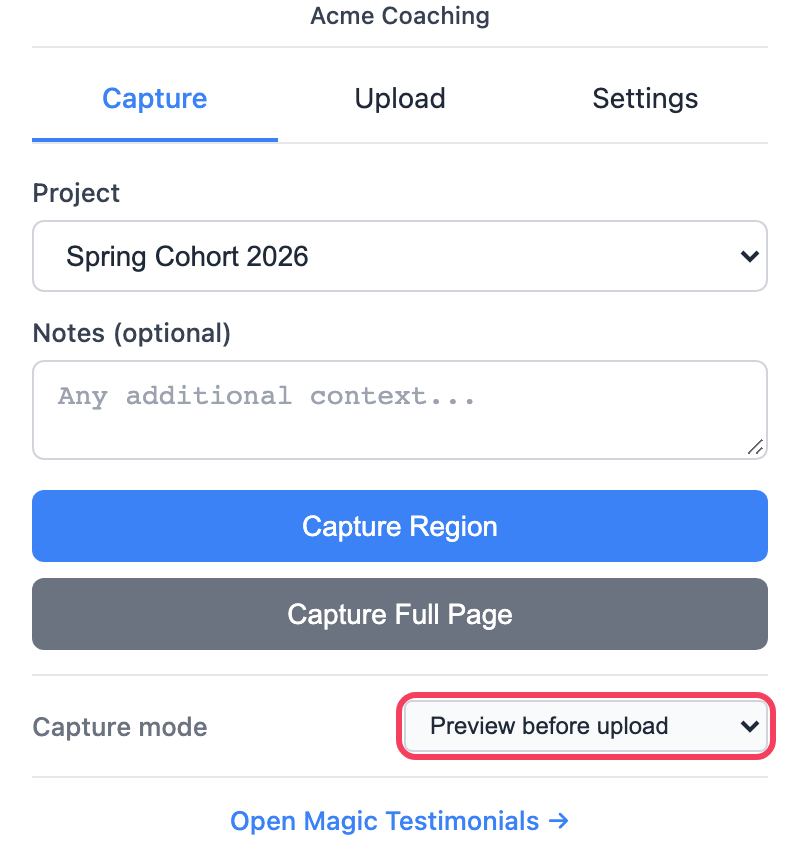
The panel holds the other options. Right-click the icon and choose Open Panel. Capture Region there does the same as clicking the icon, and it remembers the project you chose for your next captures.
To skip the preview, set Capture mode at the bottom of the panel to Quick capture (no preview). The capture then uploads as soon as you finish the box. You cannot check the image or add a note, so start with Preview before upload.
Capture Full Page
This saves what you can see in the browser window, with no box to draw. It does not scroll, so anything below the window is left out. Scroll first so that what you want is on screen.
In the panel, click Capture Full Page. A message confirms the upload.
Or right-click the icon and choose Full Page Capture. This shows no message, so look for it in your Inbox.
If several testimonials are in view, AI splits them. See Multi-testimonial split.
Send one image
Right-click an image on any page.
Choose Send to Magic Testimonials.
Check the image, the Project and any Notes, then click Capture.
With Quick capture (no preview) on, step 3 is skipped. If the extension cannot download the original image, it saves the image as it looks on the page.
Upload files you already have
Use this for screenshots from a teammate, or from before you had the extension. Files can be PNG, JPEG or WebP, up to 10 MB each. iPhone HEIC files and PDFs do not work, so save them as JPEG or take a screenshot first.
From the Upload tab
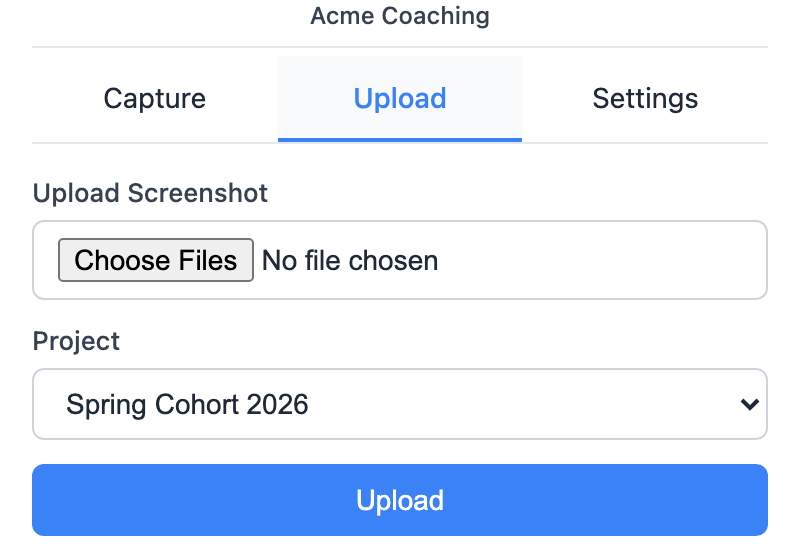
Open the panel and click the Upload tab.
Under Upload Screenshot, choose one or more files.
Choose a Project if you want one.
Click Upload. A message tells you how many were uploaded, already captured or failed.
From the clipboard or by dropping files
Right-click the icon and choose Upload or Paste from Clipboard. A small window opens.
Choose the project at the top.
Click the area or drop your images on it, and they upload straight away. Or click Paste for a copied screenshot, then click Upload.
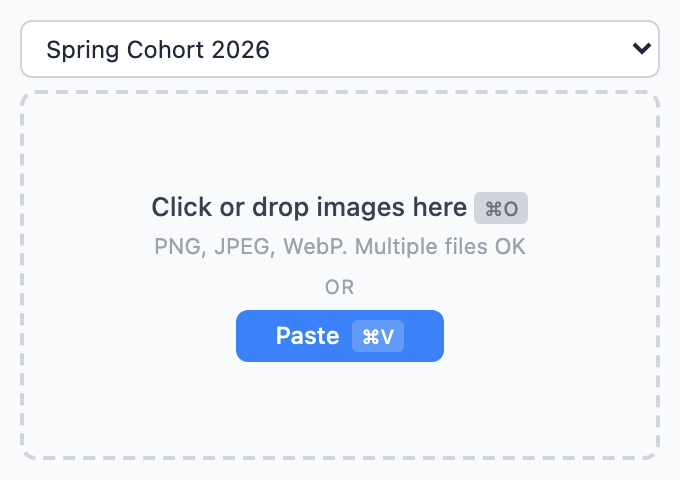
The window closes by itself when it is done.
What every mode has in common
AI captures. Each image counts as one AI capture. An exact repeat says Already captured and is not counted. See AI capture credits.
Source. Uploads have no page address, so they get no source, and they always go to your Inbox. See Project and source platform.
Having trouble? See Browser extension troubleshooting.
Last updated